Design files for this project can be found here
One of the often overlooked issued with 3D printing and hot-end design for filament extruders is the cooling mechanism that helps to solidifies the filament after extrusion. Nearly all designs utilize one or two axial fans attached on the sides of the extruder to cool the material after it is extruded. While many of these designs work fairly well, none of these designs are tuned to allow for high print consistencies when fan and print speeds are rapidly changing. Here’s my attempt at designing a fan mount for the Ultimaker 2 that tries to keep the hot-end nozzle’s temperature consistent regardless of changes in the fan or print speeds.

")
")
Background
Disclaimer: I am not a mechanical engineer. All of the points that I list here are strictly the results of my observations, experimentation, and intuition. Feel free to contact me if you believe these points are inaccurate.
One of the issue’s that I’ve encountered while trying to print precision parts from my Ultimaker 2 was that the consistency of the print varied quite a bit between layers. After hundreds of hours of prints, I’ve made the following observations:
- Tiny amounts of filament slippage in the extruder results in under-extrusion (given how little material is actually extruded). This is largely fixed by my improved extruder design.
- Filament extrusion rate is dictated by the pressure of the material within the hot-end rather than the theoretical amount of material moved by the extruder.
- Pressure within the hot-end will change when the print speed changes (filament is fed faster or slower into the hot-end) or when the temperature of the hot-end changes (hotter = lower pressure in the hot-end). A rapid increase in pressure (due to hot-end getting colder) results in under-extrusion.
- Materials (notably ABS) will shrink as they cool down. Differences in this cool-down period will result in slight variations between the layers. Slower-cooled layers will be slightly wider than faster-cooled layers.
- Both sides of the print should be evenly cooled to prevent one side from shrinking more than the other.
After extensive experimentation, I’ve found three main points that should be accounted for in order to get the highest quality prints with the greatest consistency:
- Print speeds should be consistent regardless of the time spent on each layer
- Hot-end temperature should not vary by more than a few degrees
- The material should be allows to fully cool in between layers.
The first point can be solved through software by computing the longest time it takes to print a given layer in the design and adding a delay at the end of all other layers to match this time. This is supported in Cura by enabling Cool Head Lift in the expert settings. Unfortunately, my software of choice (Simplify3D) does not support this option.
The effects of the first point can be minimized however by fully cooling the material in-between layers. This can be done by operating the cooling fans at 100% for the entire duration of the print. The problem with this method however, is that the airflow affects the temperature of the hot-end as well. As the temperature control feedback loop is rather slow on these printers, the hot-end temperature will often fluctuate by 1C – 20C depending on how fast the fans are ramped up. I’ve observed this temperature fluctuation to often be the source for inconsistencies.
In order to prevent this temperature fluctuation at the hot-end, the fans can be slowly ramped up between each layer. The downside to this method however, is that the bottom few layers will be slightly wider than the rest of the print. This isn’t an issue for 99% of the people who typically print simple models, but for those who need to print high precision parts (such as my herringbone gears) this becomes an issue that can affect the final assembly.
The downside to rapid cooling of the extruded filament is that it can cause the prints to warp if the printed model is improperly designed. ABS especially tends to shrink most when the temperature drops below 80C. To fix this issue, the build area can be fully enclosed to create a higher ambient air temperature surrounding the prints, ensuring that the temperature of the print always stays above the minimum threshold for warping. Public designs are widely available as seen here or here.
Fan Mount Designs
The stock fan mount that comes with the UM2 works acceptably well for most users. The mount is constructed out of a single sheet of metal, making it extremely lightweight. The downside to the stock design is that the exhaust outlet for the fans is uneven: the left side cools far more than the right side due to the asymmetry of the design. There are also a number of gaps in the design, reducing the amount of air that actually flows onto the material.
Venkel’s designs on the other hand, is an improvement on the stock fan mount. The gaps in the stock design are patched for higher airflow and the airflow itself is directed around the hot-end nozzle. The downside to this particular design though, is that the heater element of the hot-end is fully exposed to the moving air and is thus more prone to temperature fluctuations when the amount of airflow changes.
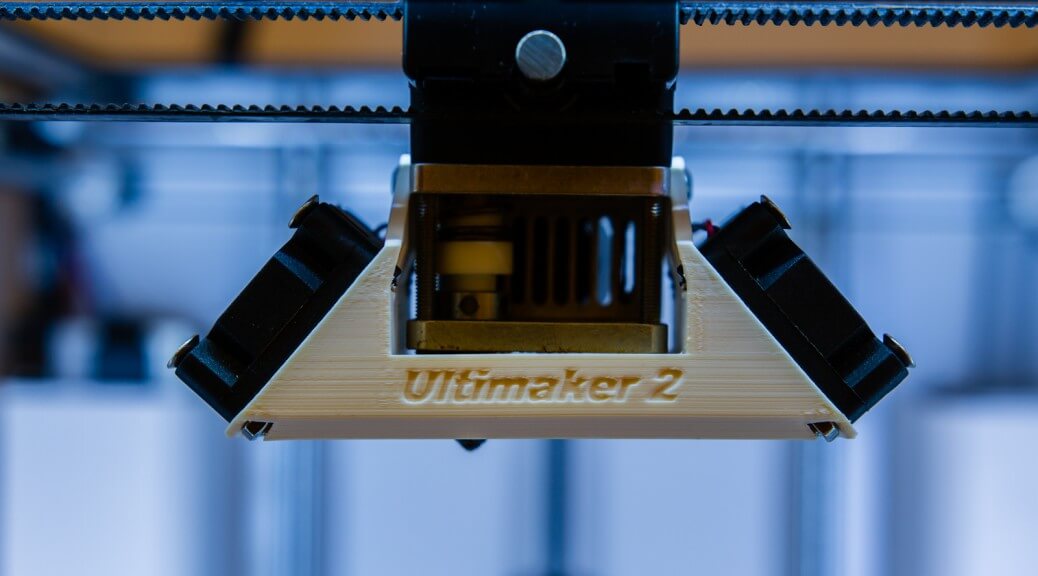
My design is an small improvement on Venkel’s design. The overall structure is similar, but it adds a base plate to fully cover the heater element. In addition, the airflow outlet is slightly smaller to direct more of the moving air directly onto the hot-end nozzle. I’ve also replaced the self tapping screws used in mounting the fans with slots for standard M3 nuts and 14mm bolts. In order to prevent the mount from warping due to the heat from the hot-end, the area in contact with the hot-end needs to be covered with Kapton tape. I’ve tested my design with six layers of 0.0035″ tape and found that it was enough to prevent significant warping of the ABS plastic used in the mount.
Update 3/23/2015
A even more effective shielding is to sandwich a layer of copper tape in between 1-3 layers of kapton tape. The copper film helps to dissipate heat and prevent it from reaching the plastic underneath. My current mount with this setup has no warping whatsoever.


")
Benchmarks
Here is a comparison between the three fan mount designs that I’ve listed above. Print settings were identical for all the following prints. Two configurations of fan speeds were tested, one with a slow-ramp of the fan over 12 layers (0% at layer 1, 40% at layer 2, 50% at layer 3, 60% at layer 4, then increased by 5% every layer afterwards till 100%) and the other being a fast-ramp to 100% on the second layer. A graph of the hot-end temperature at the start of the second layer is provided, along with some macro shots of the resulting print.
")
")
")
")
")
")
")
")


Result Analysis
As it can be seen from the photographs above, my design not only reduces the impact of the fan on the hot-end temperature but also increases the quality of the print for layers with short print times. As I don’t have to worry about the temperature of the hot-end with my design, I’ve changed my Simplify3D profile to increase fan speeds to 100% starting on the second layer. This should fix the issue with some of my parts being slightly wider at the base.
The main problem with this and other designs is that axial fans are not designed for use in high-pressure restricted airflow designs. Rather than using axial fans, I would like to replace the design with one or two radial fans to get a much larger amount of airflow for cooling the extruded material. Unfortunately I have yet to find a radial fan that is small enough to be easily mounted in the same manner. One possible design however, is to mount a large radial fan to the outside of the enclosure and connect the output of the fan through a flexible tube to the extruder hot-end. This way, the airflow is ‘generated’ from an externally mounted fan and transported to the hot-end, similar to how a bowden tube transport filament from an externally mounted extruder to the hot-end.