Design files for this project can be found here
Update 11/15/2020 – Added bucket dryer improvements and notes on molecular sieves
Update 5/16/2021 – Updated short-term filament storage design
There has been some recent developments in exploring the impact of moisture on 3D prints, and from my experience so far I’ve found that having dry filament makes a significant difference in both print quality and consistency. For the types of filament that I typically print with, drying the filament drastically reduces the amount of ooze and stringing, resulting in a noticeable improvement in print quality. Filament that is too dry however tends to have worse bridging characteristics as some plastic (PETG) becomes too sticky.

")

Drying Filament
Drying filament can be done by heating it to a point where moisture will evaporate while keeping the filament below the glass transition temperature so that it doesn’t deform. Common methods to do this involves using an oven, modifying a cheap (<$50) food dehydrator, or use commercial solutions such as PrintDry’s filament dryer. I opted to build my own from space parts I had lying around:
- Twidec MV100-B10 PID Temperature Controller (Amazon)
- T-PRO RTD PT100 Temperature Probe (Amazon)
- Omron G2R-1A-E DC12 12V Relay (Ebay)
- DBK Cirrus 60 PTC Heater (salvaged)
- 24V AC Adapter (salvaged)
- IEC320C13 AC Power Socket (salvaged)
- 5 Gallon Bucket (Home Depot)
")
")
")
")
The temperature controller came with a SSR and K-type thermocoupler, but I trialed the SSR and found that it reached 40°C above ambient when powering the heater. With the temperature in the bucket reaching up to 70°C, I wasn’t comfortable with putting a cheap SSR in there as they have a tendency to short when they overheat. Instead, I opted to use a non-solid-state relay that was rated to operate at 70°C.
The K-type thermocoupler that came with the temperature controller didn’t work very well as it had too slow of a response time and could only maintain ±5°C in the bucket even with PID control enabled. After replacing it with a PT100 RTD, the temperature variance in the (fully sealed) bucket was reduced to ±1°C.
The main drawback that I found with this bucket design is that the temperature inside the bucket is tightly correlated with the amount of airflow across the probe. When the probe was placed at the bottom of the bucket with two rolls of filament stacked horizontally on top of it, the top roll of filament reached 20°C above the intended temperature as it was directly under the heater.
I then tried placing the temperature probe midway up the side of the bucket and arranged two rolls of filament vertically to flank the probe on both sides. This worked fairly well to circulate the hot air fairly evenly throughout the bucket, but didn’t offer much safety in the event of a fan failure. Finally, I ended up placing the temperature probe at the fan’s air intake underneath the heater. This ensured that the circulated air reached the desired temperature and will also prevents the heater turning on if the fan catastrophically fails.
Drying Temperature Table
| Material | Temperature | Time | Material | Temperature | Time |
| PLA | 45°C | > 4 Hours | HIPS | 60°C | > 4 Hours |
| PVA | 45°C | > 10 Hours | PETG | 65°C | > 2 Hours |
| TPU/TPE | 50°C | > 12 Hours | CPE | 65°C | > 2 Hours |
| PP | 55°C | > 6 Hours | Nylon | 70°C | > 12 Hours |
| ABS | 60°C | > 2 Hours | PC | 70°C | > 6 Hours |
| ASA | 60°C | > 4 Hours | Desiccant | 100°C | > 4 Hours |
Long Term Filament Storage
Given that drying a roll of filament can take 24H or longer, it’s also important to also store the filament in a moisture proof container with low humidity (but not too low!). I opted to go with a few Sterilite 80qt Gasket Boxes here that have the capacity to hold up to 8 rolls of filament each. Humidity inside each dry box was monitored with an AcuRite digital hygrometer.
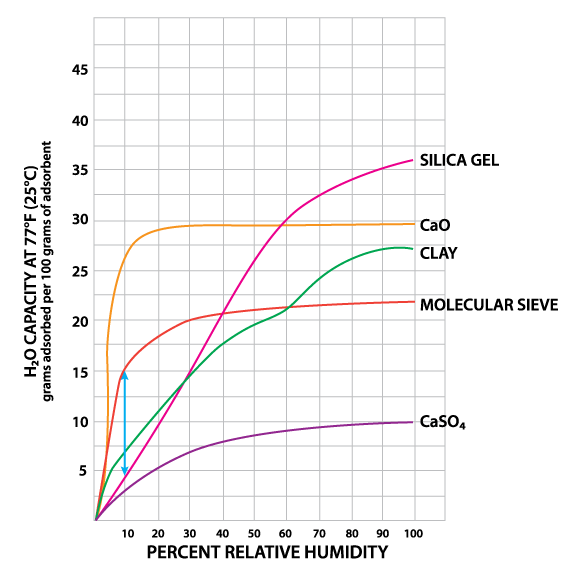
There are two main ways to regulate the humidity level in the dry box: heating the air inside the box or using desiccant to extract moisture out of the air. Heating the dry box has the advantage of lower maintenance but comes at the cost of being more expensive to operate over time. Dumping a bunch of silica gel desiccant in has the advantage of being cheap, but is messy and regular maintenance is required to bake the desiccant once it has lost effectiveness from absorbing too much moisture. Buying the cobalt chloride free type is recommended as bulk desiccant can generate a significant amount of dust.
Drying silica gel desiccant is as simple as baking it in the oven at 100°C for a few hours. One thing to note is that hot desiccant out of the oven has much higher moisture absorption rates, becoming sticky when touched and will instantly change color when immersed in water. Due to this, care should be taken to store the desiccant in a moisture proof bag before it has a chance to cool down.
I ended up going with the second method, but quickly realized that simply dumping desiccant in the box is not only messy, but also generates a lot of dust that gets on the filament. Without any air circulation, it can also take hours for humidity inside the dry box to drop to the desired level. To address this, I designed a desiccant container that mounts directly onto a standard 120mm 12V fan. To power the fan without drilling holes in the dry box, I used inductive charging coils held together using neodymium magnets. For reduced noise, the coils were modified to output 7V by changing a resistor in the voltage divider that feeds the input of the regulating IC.
The first iteration had the desiccant in a container that clipped directly onto the fan and the entire assembly was mounted to the walls of the dry box with neodymium magnets. Renewing the desiccant involved removing the entire assembly from the dry box and carefully opening the container to replace the desiccant.


Short Term Filament Storage
The last component keeping filament dry is to reduce exposure of the active in-use filament as much as possible. The Prusa MK3S has a direct drive extruder, so I designed a reverse bowden system to pull filament from a small dry box that was laser cut and assembled from acrylic panels. The volume of this box is small enough that no additional air circulation is required to keep the humidity low; just adding some desiccant is enough to maintain 10%RH.


Update 11/15/2020
One of the problems with the bucket dryer is that the upper rolls of filament tends gets quite a bit hotter than the bottom rolls when multiple rolls of filament are stacked on top of each other due to the low volume of air circulated from the heater fan. Too improve on this, I designed and printed a riser out of polycarbonate to suspend a squirrel cage fan (model DC-P-R-3) at the bottom of the bucket. The fan opening is centered directly below the heater, with the open hub of filament spool providing a clear path to pull air through to the bottom of the bucket where it then gets circulated around by the blower fan. A 5V 2A wireless power supply module, modified to output a voltage of 8V, was used to power the fan without drilling a hole in the side of the bucket.
For long term storage, I switched to using molecular sieves instead of silica gel. This article has an excellent overview of the various desiccant types. Among the various absorbents, molecular sieves have a much higher absorptive capacity compared to silica gel and is also much more effective at lower humidity levels. To test this, I bought some 3A molecular sieve from Amazon and found that it was far more effective compared to silica gel – with the RH in the dry box dropping to 1% within minutes with a bit of air circulation. Renewal of molecular sieve absorbent is suppose to be more difficult, but I found that I was able to restore the material close to its original weight by simply baking the desiccant at 450°F for a few hours in an oven.
Since building my printer enclosure, the container for short term filament storage was replaced with a container (9-1/2″ x 5-1/8″ x 8-1/8″) that sits directly on top of the enclosure. This container was bolted directly on top of the enclosure, removing the need for a bowden tube connection between the storage unit and the printer. Naturally, molecular sieve was selected as the desiccant as the operating temperature from sitting on top of the enclosure is higher than in the dry box. It did take a few minutes for RH to drop to 1% without air circulation though.


Update 5/16/2021
I identified a few annoyances with the short term filament storage design after using it for a few months. There were two problems with the open tray design. The first is that the open tray led to a small chance of the tray tipping over and splitting its content during filament changes. The second is that stiffer filaments (eg. 3dxtech’s CarbonX PC+CF) has a tendency to unwind during prints. This results in the filament digging into the desiccant and will, more often than not, cause a mess when the desiccant is displaced by the filament.
Another minor annoyance is with the hinged nature of the container, as it requires that the printer enclosure be pulled away from the rear wall when swapping filaments. The lid of my enclosure is fixed, so there really isn’t any value in having an integrated hinge in the first place.
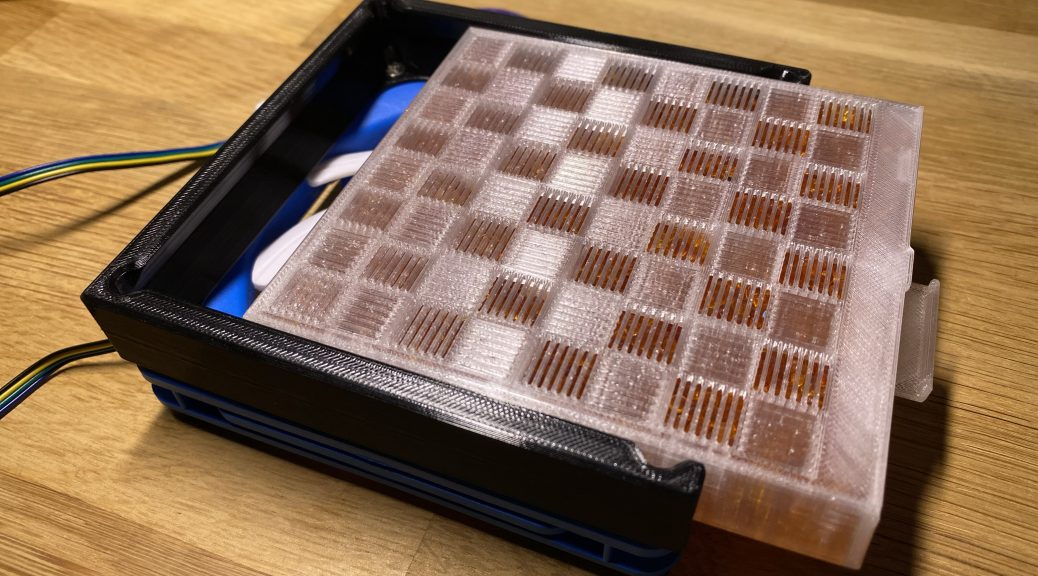
The improved solution replaces the original container with a 21 cup food storage container that is tall enough to cover the entire spool with room to spare. The lip of this container is flat, so it mates flush with the flat top of the IKEA Lack table. I have not had any concerns with humidity leaking through so far, but I suspect that some foam tape would be an easy fix if/when that happens.
The original open top desiccant tray is replaced with one that has a cover, and a separate three piece desiccant container is installed on top. The outer frame is glued (with hot glue as epoxy doesn’t work) to the container while the other two pieces make up a sub-container that holds the desiccant. The sub-container itself has latches to lock the components in place and has a separate lid to allow for easy access to its contents.


")
")
- Bottom/top layers: 0
- Parameter lines: 1
- Infill/parameter overlap: 50%
- Infill extrusion width: 0.8mm
- Infill density: 60%
- Infill pattern: Triangles
- Infill speed: 40mm/s
Grid infill at 55% density also works, but my experimentation shows that it results in significantly weaker joints at the infill’s intersection points. I was able to easily break a 1mm thick grid infill by simply bending it, but wasn’t able to do the same with a triangle infill.