Design files for this project can be found here (frame) and here (MGN12)
The more reliable my 3D printing setup gets, the greater the desire to move towards printing more exotic filaments. Materials such as nylon (PA) or polycarbonate (PC) have better trade-offs in mechanical properties compared to PLA or PETG filaments in areas such as strength, temperature resistance, and stiffness at the cost of being harder to print. One of the common requirements for printing such filaments is that the printer needs to be fully enclosed and heated to prevent drafts and temperature differentials from warping off the print bed mid-print.
Here I’ll also document and provide source files in this post for the various modifications I’ve made to my Prusa i3 MK3S in the process of moving it into a custom heated enclosure.


Printer enclosures vary widely in cost depending on how much DIY work is involved in assembling it. To keep costs down and to allow for more customization, I decided to design and build my own enclosure using Prusa’s design as a reference. Note that Prusa also has an updated design that has support for the MMU2S but I opted to reference the original as it’s a bit simpler and I don’t have plans to add a multi-material unit anytime soon.
Frame Structure
Similar to Prusa’s design, my enclosure uses IKEA Lack tables as the frame. 3½ of these tables are stacked to obtain a relatively stable structure with a flat base. Rubber non-marking casters are mounted on the bottom to allow the enclosure to be moved around with little effort. Steel right angle brackets and #8 ½” wood screws are used to assemble the bottom half of the structure for rigidity.
The enclosure itself consists of three 441×441mm clear polycarbonate panels for the side and rear panels and two 443×222mm panels for the doors. The actual width of the frame opening is 445mm2, but the panels are sized smaller to account for thermal expansion. My first iteration of the enclosure used acrylic panels cut to the full width of the frame opening, but I soon realized that acrylic isn’t intended for high temperature (~60°C) environment and that the panels also expands upwards of ~2mm when heated due to thermal expansion. To account for this, the panels are under-size and foam tape is used to ‘float’ each panel so they can expand without hitting the frame. For better noise isolation, my design uses 4.5mm thick panels rather than the 3mm panels from Prusa’s design. The panels themselves were custom ordered from a local Tap Plastics store. Similar to Prusa’s design, the panels themselves are secured to the frame using custom printed corner brackets.
For lighting, I used two link-able LED light bars mounted vertically to the frame with both lights angled towards the center of the enclosure. This provides sufficient lighting without any shadows blocking the print. Power for the light bars is routed through a dimmer switch mounted to the front of the enclosure.
To reduce noise from vibrations, a heavy 16lb porcelain tile sitting on 4 Sorbothane rubber bumpers is placed between the table and the printer. The printer itself has an additional 6 of these rubber bumpers between it and the porcelain tile for a total of 10 bumpers to isolate printer movement from the frame. These bumpers are critical as the hollow internals of the Lack table tops naturally amplify the noise from vibrations that does reach the frame.


")


Printer Upgrades
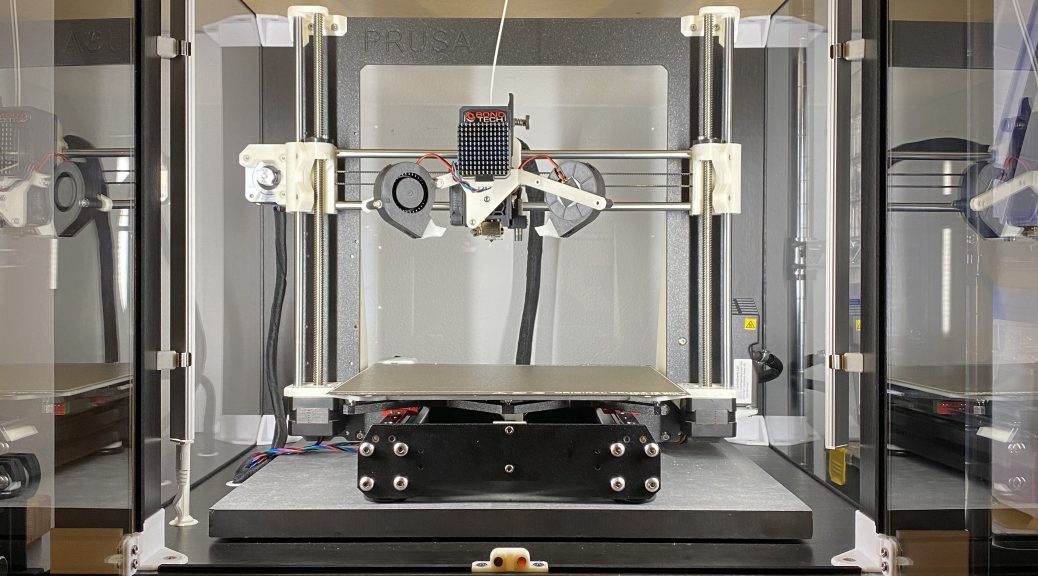
As the printer will be operating in a high temperature environment, all 3D printed components of the Prusa i3 MK3S were replaced with parts printed out of Prusament polycarbonate blend. This increases the maximum operating temperature from 85ºC (PETG) to around 110ºC and also resulted in additional strength and stiffness for the printed parts.
As my enclosure has active heating, both the EINSY controller board as well as the PSU were moved out of the enclosure and mounted to the bottom of the enclosure to keep them from operating outside of their rated temperate range. This required making a few custom extension cables to route the stepper cables and heated bed wires to the new location. Custom frame braces was designed to replace both the EINSY and PSU.
As the stepper motors heat up quite a bit when printing, 40mm aluminum heatsinks were attached to the X, Y and E motors to try to keep their temperatures within the rated operating range.
A Cirrus 60 PTC heater is used to actively heat the enclosure and a DPST switch is used to toggle AC power to both the Twidec MV100 PID controller as well as the 24V line routed from the PSU to the heater’s fan. This ensures that the fan is always running when the heater is powered.
Additional upgrades include:
- Installing a Raspberry Pi 3B with Octoprint for remote monitoring
- Installing the Bear X-Axis (1.0) with custom tensioner for 16T pulley
- Replacing the stock extruder with the Bondtech Prusa MK3S extruder
- Modifying the carriage belt mount to be a single part rather than two separate pieces
- Modifying the bed cable cover to have a lower profile
- Replacing the Y rails with a MGN12 linear rails for a bit of noise reduction
- All the other upgrades as described in my custom cooling shroud design post
Bill of Materials
| Name | Quantity | Price (total) |
Link |
| Lack Table | 3 | $45 | IKEA |
| Rubber Casters | 4 | $24 | Home Depot |
| Right Angle Brackets (50) | 1 | $15 | Amazon |
| #8 ½” Wood Screws (100) | 3 | $7.50 | Amazon |
| 441×441mm 4.5mm PC Panel | 3 | $66 | Tap Plastics |
| 443×222mm 4.5mm PC Panel | 2 | $22 | Tap Plastics |
| 1/4×1/8″ Foam Tape | 1 | $10 | Amazon |
| 6×3mm Neodymium Magnet (4) | 1 | $5 | Ebay |
| LED Light Bar | 1 | $27 | Amazon |
| LED Dimmer Switch | 1 | $32 | Amazon |
| Porcelain Tile | 1 | $9 | Home Depot |
| 40mm Heatsink (4) | 1 | $8 | Amazon |
| Sorbothane Bumper (4) | 3 | $45 | Amazon |
| Cirrus 60 PTC Heater | 1 | $60 | Ebay |
| Twidec MV100 PID Controller | 1 | $34 | Amazon |
| PT100 RTD Sensor | 1 | $12 | Amazon |
| DPST Switch | 1 | $5.50 | Digikey |
| IEC Socket | 1 | $1 | Digikey |
| Molex 70400 4pin Male Housing | 6 | $3.60 | Digikey |
| Molex 70400 4pin Female Housing | 6 | $3.36 | Digikey |
| Molex 70400 2pin Male Housing | 2 | $0.52 | Digikey |
| Molex 70400 2pin Female Housing | 2 | $1.05 | Digikey |
| Molex 70400 24-30ga Male Pin | 30 | $4.5 | Digikey |
| Molex 70400 24-30ga Female Pin | 30 | $3 | Digikey |
| 1/4″ Wire Loom | 1 | $15 | Amazon |
| Hiwin MGN12H + Rail (2) | 1 | $82 | Aliexpress |
| Hiwin MGN12C | 1 | $22 | Aliexpress |